How To Tuesday: Photography Lighting Part I.
This entry was posted in How To Tuesday and tagged Lighting, Photography, White Balance on August 31, 2011.
Lighting is the most important factor to consider when snapping the perfect photo. Light is what makes sight, colour and, more specifically, photography possible. Without the proper light your photos can appear dull, lacklustre and tinted.
Because I am primarily a natural light photographer that is the method I will discuss with you, but artificial light is an option as well. I prefer natural light because of it's ease of use, consistent abundance and that it conveniently streams through my kitchen window. It's not without its challenges, but in the next few weeks we'll talk about how to overcome each of them.
One prominent challenge that natural light presents is white balance. Not everyday is filled with bright, sunny and cheerful light. Some days are cloudy, rainy or maybe you've lost track of time and the sun is quickly escaping.
You might have noticed that bright high sunlight is somewhat yellow or orange in colour. Cloudy or overcast light is very white. Rain clouds, evening light, shade or winter sunlight create very blue tones. That's why it's important to adjust your white balance settings to communicate the truest colours possible in your subject.
This effect can be achieved one of three ways. The easiest method and the one I use is to choose one of the premade settings on your camera. Most cameras, DSLR or otherwise, have a selection of at least seven basic white balance settings: auto, daylight, shade, cloudy, tungsten, fluorescent and flash.
The auto setting meters the light and adjusts the colour balance accordingly. This might seem like an easy choice but auto is definitely not foolproof and I would only recommend it in situations where you don't have the time to play around to find the right setting. Daylight white balance leans towards a bluer tint to counteract the orange casts of direct sunlight. It can be tricky to use in diffused sunlight, but it's still the setting I use most often. Shade is obviously the setting best suited to shady situations as it defends against the cool tones of true shade with lots of warm tones. The cloudy setting is also warm like shade, but not as extreme. In the cold winter months I use this setting almost exclusively. Tungsten is very blue to balance the super yellow tint that comes from indoor lighting. Florescent is very green and flash is slightly warm. I have never used the last three settings personally because I've never played with shooting in unnatural light, but it would be a good idea to get to know them.
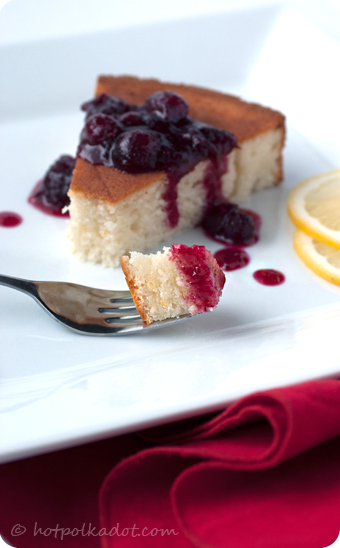
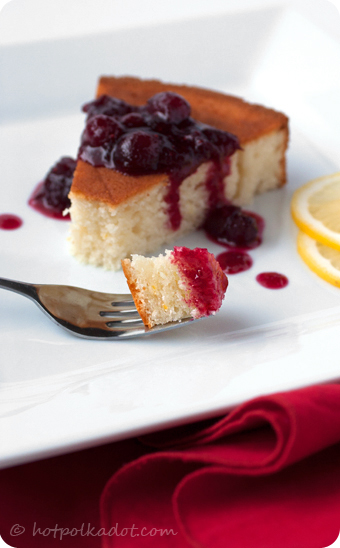
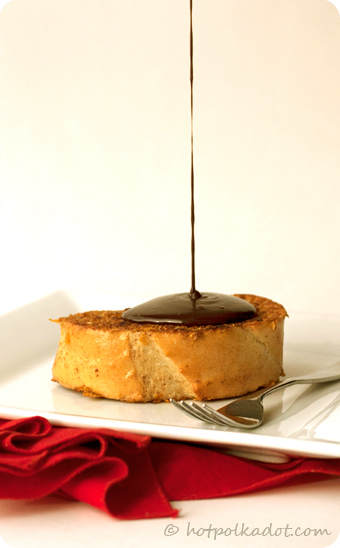
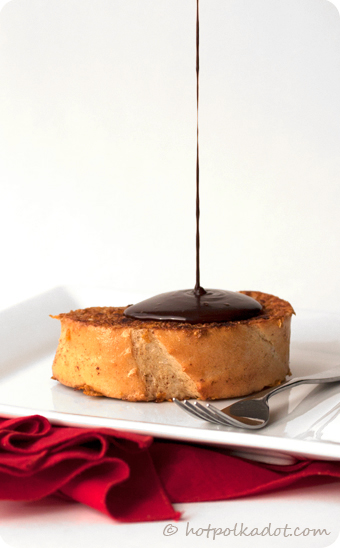
Here you can see the white balance presets hard at work.

 In the set of Cranberry Pomegranate Yogurt Cake photos you can clearly see the difference in colour temperature. The first I shot using the daylight setting. The image has a definite blue tint to it and the reds of the cranberry sauce actually appear more purple. The second photo was shot using the cloudy setting so I could effectively warm up the colours on that overcast day. The reds and yellows are true and the plate is white instead of blue.

 In the set of Stuffed French Toast photos there's another obvious difference. The first photo was taken using the shade setting because I was experimenting with low early morning sunlight. The image has an unmistakable warm tint to it and the pure red napkin looks more orange than anything. The second photo was shot using the daylight setting along with a little playing in Photoshop to neutralize the colour of the background. The napkin is red again and the french toast looks real instead of something moulded out of yellow play-dough.
The second method for setting white balance is manually. Using the manual white balance camera setting is simple. All you need to do is point the camera at something you want to define as neutral in your current lighting conditions. Doing this teaches your camera the exact white balance you need for each specific shoot. You can do this with any matte surface that is medium or 18% grey in colour. It could be a notebook, a napkin, a plate or a grey card that you can get specifically for this method.
The final way to set white balance is digitally while you're processing your photos in photo editing software like Photoshop or Lightroom. In Photoshop you can either play with the colour balance until you get the right effect or use the replace colour feature and choose a colour you know to be neutral and return it to it's true hue. In Lightroom the effect is much more elegant. You are able to select the medium grey you want for the white balance and apply it to all of the photos in the shoot using the synchronize feature. That way you don't have to fiddle with each image individually. If you can avoid it I wouldn't recommend correcting your white balance during post-processing. It can become a crutch and sometimes, depending on the severity of white balance issues, you can't quite restore the colours to their original states. I use post-processing white balance as needed for tiny touch ups, but I try to set the proper white balance as best I can while the camera is still in my hands.
Whatever way you choose to set your white balance it's important to experiment with each. As a natural light photographer, light is your a challenge and colour can be your weapon. The more you play with white balance the easier colours are to identify. Have you ever had that argument over weather a school bus is yellow or orange? White balance is the key!


